Sunday, March 27, 2011

Homemade Hair Bows

I had to wait to post this one considering I made these for my girlfriend as part of her baby shower gift and her shower was just yesterday.  These are very easy and you can get as creative as you want- add beads, buttons, crystals, etc. 


Here is what you will need...  Hair clips- I purchased box of 80 clips for around $6 from Sally Beauty Supply.  Ribbon- I purchased mine from Michaels and they ranged from $1-$3 a spool.  You will also need a glue gun, lighter, thread and needle for this project. 


Start with using your glue gun to attach ribbon to your clips so that there are no sharp ends.  You should use a lighter to singe the ends of your ribbon so that they do not fray.  To do this just hold the lighter to the end of the ribbon but to not touch the ribbon with the flame, you want to hold it close enough so that it melts.  Obviously an adult should do this portion of the project if you are working with children for this project.  You should always be careful when working with fire and flammable products.


Next you will start to make the bows you want to use.  You should also take a lighter to singe the ends of your ribbon on this step as well.  I do not cut the length of ribbon until I make the shape of the bow and see exactly how much I will need.  Once you have the bow shaped you should take your needle and thread and put it through the middle of the bow, wrap it around the entire middle of the bow loosely once or twice and then while holding the middle of the bow between your fingers pull the thread tightly- this will ensure that the bow pinches the way you want it to and that the ribbon does not turn in a direction that you do not want.  Wrap the thread around a few more times and then tie it off. 


You can now get creative at this step.  If you want to add a knot at the middle to hide the thread just take a small piece of ribbon, knot it and glue the ends of the ribbon to the back of your bow.  You can also add beads or buttons if you want, whatever you like would work.  Once your bow is complete you will put hot glue to the top of your clip and attach it to the back of your bow. 


Get creative, make different types and sizes of bows.  I made quite a few and I thought I took pictures of all of them but they are not showing up on my camera.  Oh well, have fun with this easy project :)

Friday, March 25, 2011

Time to stock up on....

Your crafting supplies!  Michaels is having an amazing deal this weekend that I wanted to share.  From this Sunday, March 27th till next Saturday April 2nd, you can get 25% off your entire purchase- even sale items!  I have not seen them give a coupon like this in quite some time so get ready to shop.  I know I will be stocking up on scrapbooking, painting & jewelry making supplies.  


They also have a 50% off one regular priced item this Saturday only. If you do not already receive their emails make sure you sign up at Michaels.com so that you can get these great coupons.


Thursday, March 24, 2011

What woman doesn't love shoes!!

So no projects today :(  Don't you worry though, I'm working on something tonight and I should have it posted in the morning.  


I did want to just take a minute to share a great deal I got today...  This is only for today so if you are interested make sure you get it today.  Go to Eversave and sign up your email address.  You will receive a $5 credit just for signing up and it's free to do so.  The deal I got today was for a $40 gift certificate for just $20 to heels.com and with your $5 credit that makes it just $15!  This was on the New York City site but I also saw it under Buffalo so it is in multiple markets and it doesn't matter where you purchase it from because it is for an online retailer so you can use it no matter what.  I used my gift certificate already to purchase a pair of shoes that I needed for a wedding.  Unfortunately I signed up for this site a while ago and at the time they only had a $2 credit which made my gift certificate $18.  After everything was done I bought a pair of $49.99 dollar shoes for $27.99 and free shipping.  Great deal so I thought I would share :)


Wednesday, March 23, 2011

Bling Bling Necklace on a Budget

So for a while now I have been eyeing up a necklace I have seen Giuliana from Giuliana & Bill wear on their show.  I have searched long and hard for this type of necklace with no luck, at least without spending a small fortune.  While I was out getting some jewelry making supplies I actually found the things I would need to make this elusive necklace.  Michaels actually sells these thick chains in all kinds of colors and sizes.  I went with a large size gold chain, medium size light gold chain (light enough that it is almost silver) and a small size bronze chain.  I did this project last night and it was one of the quickest jewelry projects I've done, it probably took me about 15 minutes start to finish. 

Here is what I purchased...  3 strands of chain, package of gold colored rings to attach everything together and a package of gold clasps.  I spent around $16 for the supplies after a 40% off one item coupon I had which saved me $2.  I used all of the chain but still have plenty of rings and clasps left over for future projects.  You can even save more money if you keep an eye out for your local craft supply store sales.  JoAnns, Michaels, AC Moore and Hobby Lobby always have coupons as well.  This necklace turned out similar to a necklace I found through an in home party jewelry companies magazine for $86.  Since I made it myself I saved around $80 compared to the other necklace I found!!  :)


Tuesday, March 22, 2011

Teaser of tonight's project which will be tomorrow's post...

Love this one...

Signs of Spring

With this crazy up and down weather we've been having, I just wanted to share this picture of a flower I picked while out for my run on Saturday.  Yes we are supposed to get more flurries this week but hang in there, Spring is surely on its way.

Monday, March 21, 2011

Distress furniture using Milk Paint

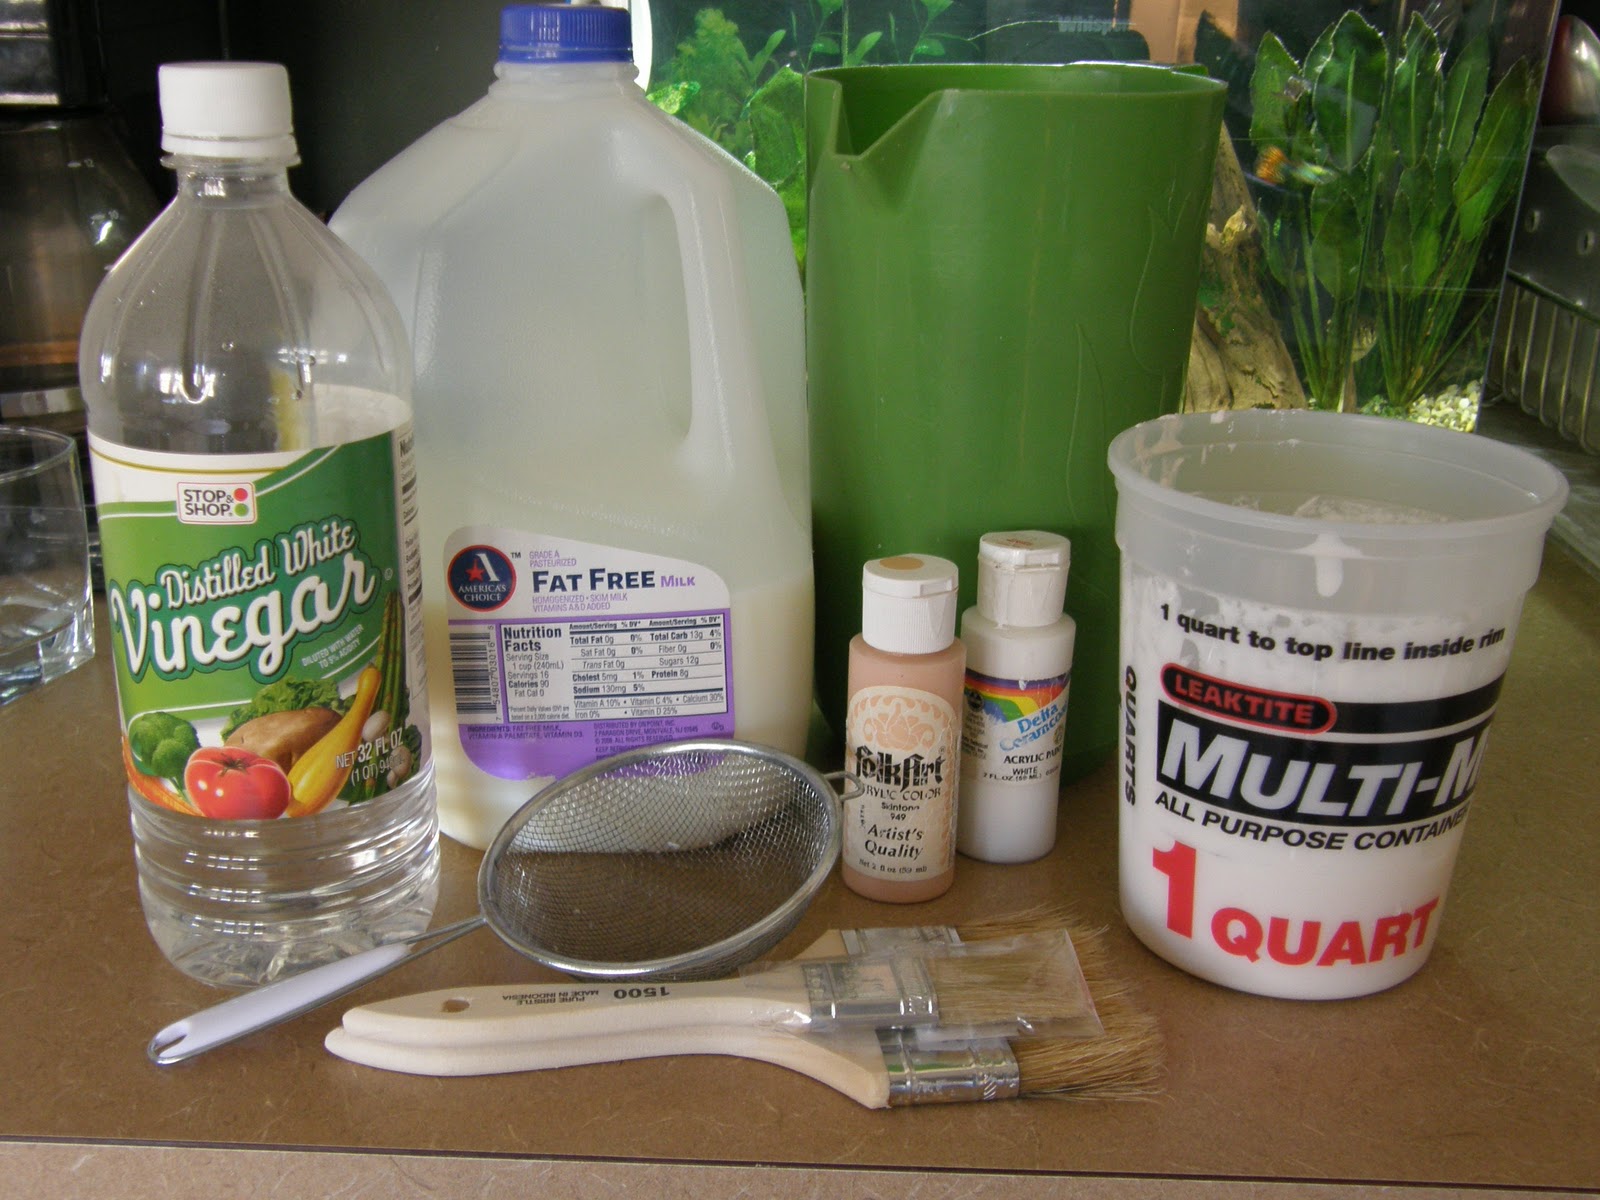
For this project you will need:

Piece of Furniture you would like to Distress
Sandpaper- large and small grit (I used 80 & 200)
Damp cloth or Tack Cloth
1 Gallon Skim Milk
2 Cups Distilled White Vinegar
Cheesecloth or Strainer
2 Tablespoons Lime Juice
Acrylic Paint for color
Natural fiber paint brush
1 Small can Clear Furniture Finish (I used a water based polycrylic clear satin finish)


This is what started it all, my most recent project- a wooden end table for a sitting area in my office.  I wanted to get a nice white-washed/antique looking table and yes, I found many- for a price.  I was not about to pay $150+ for something I could make myself so I decided to do just that, make it myself.  I figured I would be able to get a decent table at a garage sale, after all I would be repainting it anyhow.  I decided to go to a nearby garage sale that I found listed on Craigslist last weekend to look for a table and I found one- a nice one actually.  I knew it had to be solid hardwood- no particle board since I would be sanding it.  The table I found was exactly what I was looking for and it was a great price, only $10!!  It was in such nice condition that I would have been able to put it in my house as is. 


I brought the table home and began to sand it down.  Luckily I have a palm sander which made the work much easier and quicker but you could do it by hand if need be.  I noticed after getting to the painting stage that leaving some areas sanded better than others actually works in adding to the character of the table.  The paint will adhere better to the well sanded areas and will crack more in areas that still have some varnish left on them.  If the piece of furniture you choose to use has imperfections that it great, don't forget we want the piece to look old.  I would use the rougher sandpaper to start (80 grit) and then move to the finer paper (150 or 200 grit) to finish it off.  Once sanded make sure you clean the dust off well, you could use a damp cloth or I used a tack cloth which I used and purchased at Home Depot. 

Now we get to the interesting part- making the Milk Paint.  This project was really born out of my curiosity of Milk Paint.  Before starting the project I had researched what product works best to paint distressed looking furniture and most of the information I found pointed to Milk Paint.  You can purchase milk paint on-line, I think it runs about $40/gal.  Of course the "frugal" side of me thought, I wonder if I can make Milk Paint.  Maybe it's just a watered down standard interior wall paint or maybe, just maybe it actually has milk in it- crazy right!  Well, I found out after researching that Milk Paint is just that- MILK.  Here is how you make it...


Supplies for making paint:
1 Gallon Skim Milk
2 Cups Distilled White Vinegar
Cheesecloth or Strainer
2 Tablespoons lime juice
Acrylic Paint for color

How to prepare:
Leave the milk out until it reaches room temperature.  Pour the milk into a container large enough to fit the milk, you could divide into two separate containers if you need to.  Pour the vinegar into the milk which starts the curdling process, remember to pour one cup in each container of milk if you needed to divide the milk between two containers.  Let the milk sit out overnight to allow it to curdle, stirring once or twice if possible.
The next day you'll be able to notice the milk solids separating from the liquid whey. Have everything ready prior to mixing since milk paint should be used when it's fresh.

Take the curdled milk and pour it through a cheese cloth or strainer to separate the curds from the whey (I used a strainer since I had one readily available).  Do this over a sink since you will end up discarding the whey and keeping the curds for your paint.  Take the curds that you have collected and rinse them with water through your strainer, you may have more curds than will fit in your strainer so just do this in portions- be sure to remove most of the water leaving the curds damp but not dripping. 
Take your curds in your container and add the lime juice which will help dissolve the curds and also add your acrylic paint for color (I wanted to keep it white so I just added about a teaspoon of white paint with a few drops of a cream colored paint to soften it a bit).  Mix everything well so that you are left with a pasty substance with no large curds left.  A helpful hint, if you want to speed this process along use a blender- it will also give your paint a better consistency.  The paint will cling to the sides of your blender so be sure to stop a few times and use a spatula to push the mix down.  Yes the paint does smell but the smell will be gone once the paint dries. 
Now you can begin painting your piece.  First be sure to place a drop cloth under your piece since the paint gets messy.  The paint will go on very clumpy and that is totally fine, imperfection is great when trying to make something look old.  With this being the first time I worked with milk paint, the first coat I put on I thought for sure it would flake right off once it dried.  I let the table dry for about an hour outside in the sun (you may want to allow for extra time if painting indoors) and to my surprise, it actually worked!  The paint dried just like I wanted it to and cracked up perfectly.


You can now lightly hand sand your piece to remove the flaked paint using the fine grit sandpaper.  Take a damp cloth or tack cloth to remove dust from sanding and then you will be ready to apply another coat, let dry and repeat sanding again. 


You are now ready to seal your piece.  I used a water based polycrylic clear satin finish.  I applied one coat, allowed to dry overnight and then applied another coat.  My table now looks great and I saved at least $100, I can not wait to find the perfect chair to put next to it.  Here is just one last pic of it in my house next to a chair I already have to show the feel I am going for.  I will post an updated picture of the entire set up once it's complete.
I will be replacing the rug, getting a new chair and possibly keeping the ottoman (reupholstered myself)

What does it mean?

After some encouragement from my friends at work I have finally decided to start a blog.  I am always crafting and coming up with ways to make things very inexpensively and a few people have told me that I need to share my ideas and projects so here goes.  Of course the next step was coming up with a name and for some reason Functional Fruitions seemed to fit the purpose of my blog- projects with a purpose coming together as I envisioned them.  I hope you all will tune in for more :)

What does it mean....?
func·tion·al
  • Designed for or adapted to a particular function or use

fru·i·tion
  • Realization of something desired or worked for; accomplishment
  • Enjoyment derived from use or possession